Level Building
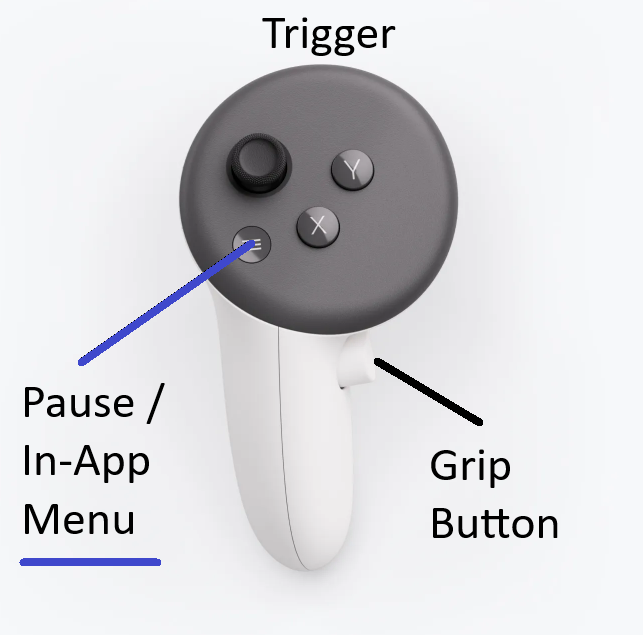
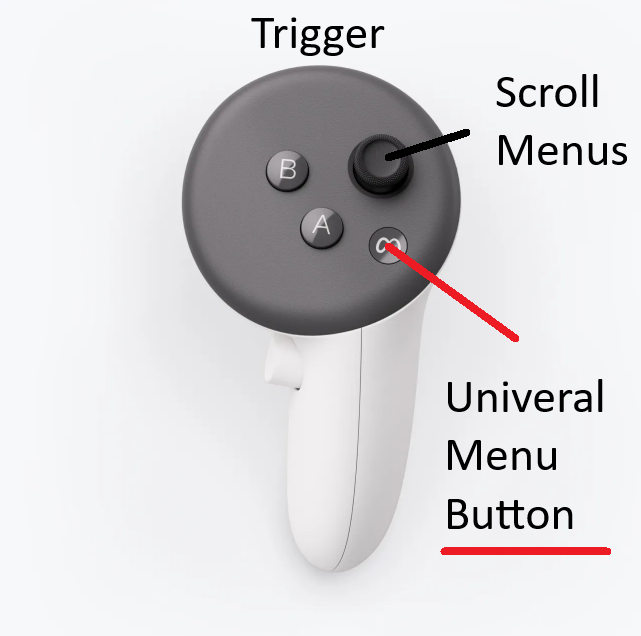
Here’s the name for the important controller buttons.
Tips for Creating Levels
Open the Level Builder using the button on the side menu to the right of the main menu. You’ll see a new large menu open up to your left.
In-game instructions are shown in the little menu that opens up by your left feet when you open the Level Builder.
‘Sculpting’
You make a level by Sculpting it. This term comes from the origins of Groove Catcher, the Sculptor music sculpture tool.
Groove Lines are the curvy blue and yellow lines that you follow while you’re playing Groove Catcher.
Beat Cubes are the cubes that you smash to make them blow up.
First - choose a song to work with. If you’ve loaded your own song (see Sideloading, below), then you’ll see it in the list of songs.
Next - to start sculpting, click the ‘Make Section 1’ button on the menu by your left to the left.
Draw a Groove Line - hold down the controller Trigger button on either hand (at the front of the controller) to draw a Groove Line
Drop a Beat Cube - press the Grip Button (on the inside of the controller handle/grip) to drop a Beat Cube wherever your hand is.
Stopping - quickly click the “Pause / In-App Menu” Button (see above) on the left controller. You’ll see a little menu open up to your left. You can jump back to the beginning of the level/song, or back to the spot that you most recently started from.
Catching - you can try what you just made by clicking the ‘Start Catching’ button on the same menu to the left by your feet. When you’re satisfied, create your next Section.
Sections
You can make a level using one or more sections. Each section is simply what’s recorded between each time you hit start and stop. So you can work on a song one part of a time, which makes it MUCH easier to get things how you want them.
I make levels by working the song in short sections. The length of the section depends on how hard it is to get things the way I want them. I keep working on a section and deleting it until I’m happy, then move on to the next section. Scrubbing is your friend - see below.
Deleting the most recent section
This is your friend for making great levels!
You can delete the most recent section you made after you stop recording. Do this by clicking the ‘Delete Section N’ button in the menu (N is the most recent section number you made). Pay attention to what section number you’re deleting - you can see the section numbers that’s shown as a tooltip for each sculp and beat cube. Be careful - there is no undo button to get your section back! And you currently can delete only the most recent section.
Scrubbing
Moving through the level quickly.
You can scrub (move quickly) through your level this way:
1) hold the grip button, and
2) moving the thumbstick fwd/back.
This is VERY helpful. Watch your feet for the song time. When you stop recording, you’ll get brought back to the point in the song where you started recording - this makes it easy to check what you just did. You can scrub while stopped, sculpting or catching.
Sideloading Your Music - aka using your own music
You can “sideload” your own music and make your own levels using your own music (audio files).
Quest
1) Download and install SideQuest. This is the easiest and most common way to load files onto your Quest. Follow the instructions on the SideQuest installation page to get thing set up and to connect your headset either using a cable or over wifi. Sometimes you have to restart your computer and/or you Quest to get the connection to work. You’ll need to have a Meta Developer account, see the instructions on the SideQuest site.
2) Once your Quest is successfully connected to SideQuest, you can open the ‘Manage files’ view by clicking on the folder icon.
3) Then click on the Android folder to open it
4) Then keep clicking on folders until you open up Android/data/com.vizmoo.groovecatchertx/files/Music
5) Drag and drop your audio files (mp3, m4a, wav, ogg) into the folder and they’ll get copied to your Quest. Or you can click the ‘+’ button in the lower-right of SideQuest. After you’re done, go back to the Quest and run Groove Catcher (or quit it and restart it if it’s already running).
Then you’ll see your songs in the Level Building menu.
Moving & Sharing Your User-Made Levels
NOTE - if you used sideloaded (i.e. your own) music to make a level
The person you give you levels to has to also have the same audio file set up for sideloading like described above.
Where are the level files?
Quest
Follow the instructions above under Sideloading Your Music to get connected using SideQuest.
Then the level files you make are in this folder:
Android/ data / com.vizmoo.groovecatchertx / files / User Levels
IMPORTANT: Be sure to copy both the matching sculps.sz file and the level.json files, as explained more below. If you get files from someone else, you can copy them to this folder.
The Level files themselves
For each level you want to move or copy, grab both the sculps.sz file and the level.json file.
The filenames are structured like this <Song name>.<Level name>.<unique id>.[sculps.sz or level.json]
Changing the level name - making a copy
If you edit a level in the game and change its name and save it, it will make a new level and sculps files with a new unique id, and the original/previous one will be left as-is in the folder. Changing a level’s name from the files themselves is more complicated.
Sharing your levels
For now copy the files like described above, and simply drop them in the same folder in another headset.